
[ad_1]
This is our favorite No-Knead Bread — an artisan-style white bread using simple, everyday ingredients and requiring only minimal hands-on time. Plus, all the tips and tricks to ensure success every single time!

Easy No-Knead Bread Recipe
If you haven’t traversed into the world of bread making, THIS recipe is the place to start. And — fair warning — once you make this recipe, you may never turn back.
We are truly obsessed with this bread recipe — not only is it ridiculously tasty, but it’s also surprisingly easy to replicate with minimal hands-on time.
Check out this quick checklist of the pros:
- No stand mixer or bread maker needed
- No kneading required (in fact, very limited hands-on time at all)
- Several options for baking/resting the dough so you can have hot bread when it works with your schedule
- No special tools or utensils required to prepare the bread
- No crazy ingredients and no complicated methods

What is No-Knead Bread?
It is a method of bread baking that uses a very long rising time instead of kneading. The long rise time forms the gluten strands that will give the bread its structure and texture. This bread is characterized by being a very wet dough (you couldn’t knead it even if you wanted to!) and with an overall lower yeast content. The long rise also helps develop a great dough flavor.
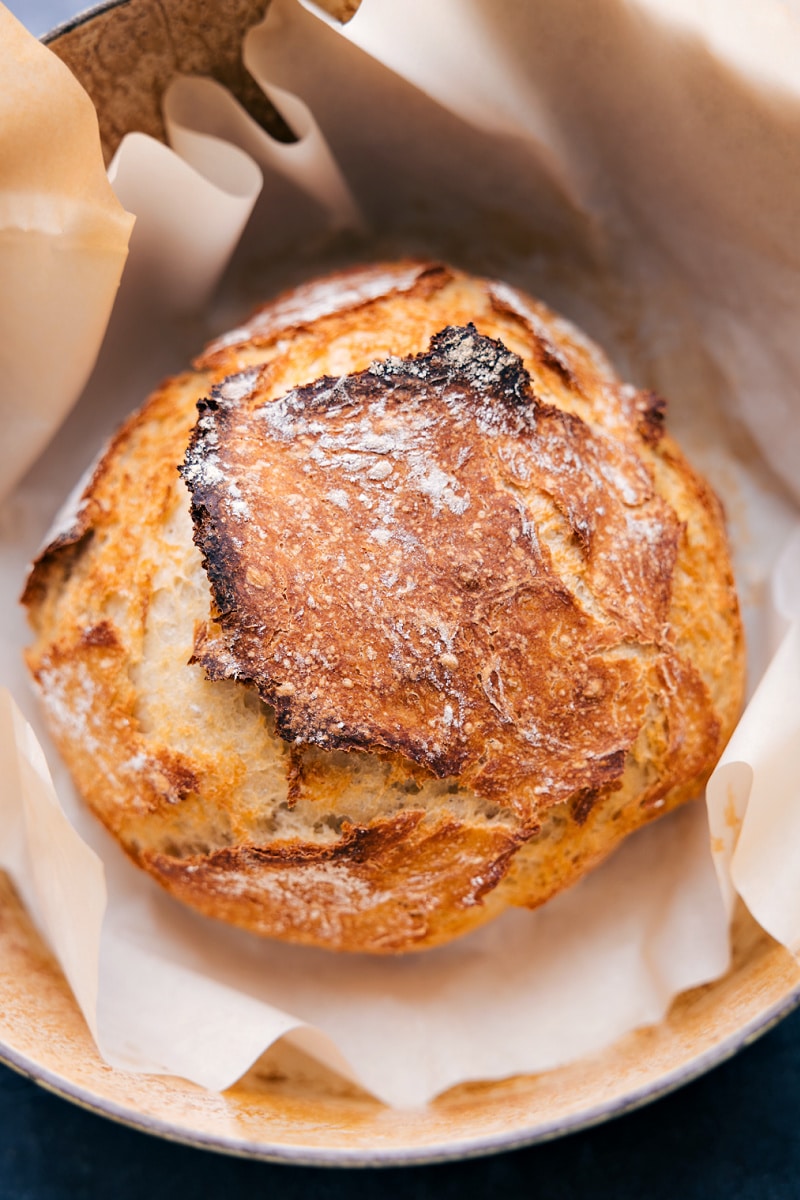
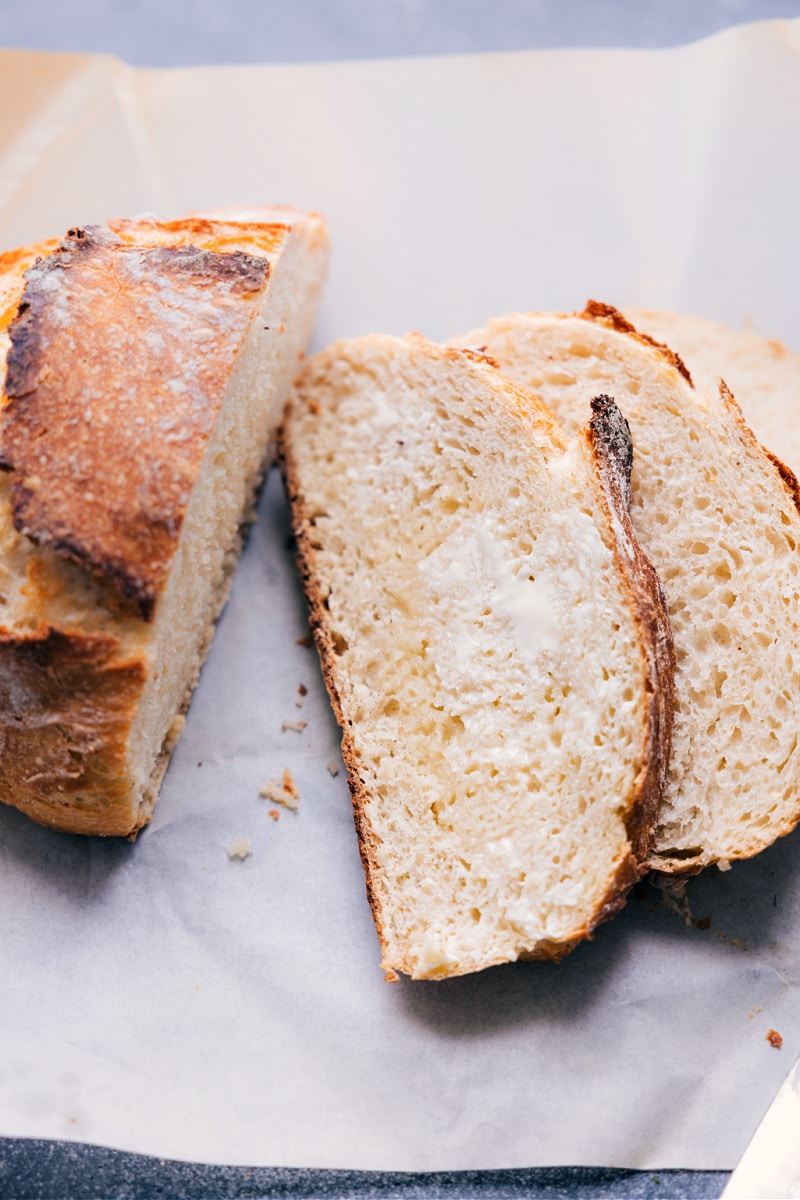
No-Knead Bread Texture when baked: wonderful light crumb with a nice chewy interior and a crisp, crunchy crust!
The structure of the dough is surprisingly different from this all-purpose White Bread that relies on kneading for its structure and texture.
This particular “miracle bread” recipe is based off of Jim Lahey’s famous No-Knead Bread recipe (from New York Times). Today I’m sharing all the tips and tricks I’ve learned over the years from making this bread an embarrassing amount of times. I thought it would be helpful to add in all the details in case you want to bake this bread right away (without waiting overnight) or if you want to make the dough but let it sit for a few days before baking. Or perhaps you happen to have a different type of yeast or flour than the recipe calls for– I’ve got all the details on that!

No-Knead Bread Ingredients
- Warm water. We want to provide an ideal environment for yeast — see “quick tip” below.
- Yeast. It provides the leavening for the dough causing it to rise and expand.
- Flour. We use plain, all-purpose white flour here
- Honey helps the yeast to grow nicely.
- Salt adds flavor and without it, the bread will taste bland and flat. Salt is also important to the bread’s structure. It tightens the gluten structure and helps control the pace of yeast fermentation.
- Olive oil helps the dough rise and develops the finished bread’s flavor — yes, even a small amount makes a difference.
A few No-Knead Bread Variations: We’ve replaced the water with whole milk to give it a subtle sweetness and richness, but less chew. We’ve also replaced the white flour with bread flour which will provide more structure– causing the bread to hold its shape better.

QUICK TIP
How to tell when your water is at the right temperature? Use the wrist test! Drizzle a few drops of the warmed water onto the inside of your wrist. If it is warm and comfy for you, it will be perfect for the yeast. If it is not warm and instead feels hot, it will be too hot for the yeast. Too cold and the yeast will simply remain dormant.

Let’s Chat Yeast
Proofing the yeast shows us if the yeast is still alive and active (yeast is a living organism). We have tested and included directions for both active dry yeast and instant yeast in this recipe — either will work and both have been tested.
I find it very helpful to make sure you can see the yeast has been activated before moving on to the next steps. If the yeast doesn’t activate, the bread won’t rise nicely.
- When activated, yeast will grow, get foamy and appear creamy.
- Why didn’t my yeast activate? If the yeast doesn’t prove, this can be because the yeast is old (dead), the water was too hot, or the water/environment is too cold. If the water/environment is too cold, the yeast might wake up but release a substance that hinders the formation of gluten in the bread.

No-Knead Bread Without A Dutch Oven
This bread is intended to be made in a hot 5.5- or 6-quart cast-iron Dutch oven. As long as the pot is at least 5 quarts, the size doesn’t matter. We aren’t using the pot to shape the bread but rather to give the dough steaming space (think — a steam oven).
When the wet dough goes into the hot Dutch oven and is covered with a lid, it is now in a hot and humid environment. This will ensure the heat is concentrated around the dough to yield a beautiful crisp crust. Here is a great affordable cast iron pot and here is my personal favorite pot!
To make No-Knead Bread Without Dutch Oven, we can somewhat replicate the steam by creating a “steam bath.” Here’s how:
- Add bread dough to parchment paper per the recipe. Pick up bread on parchment paper and place it on a metal sheet pan.
- Grab an 8 or 9-inch metal pan (not glass — it could shatter). Place empty pan in the oven leaving room for the sheet pan with bread.
- Bring a large pot of water to a rolling boil.
- Place sheet pan with bread dough in the oven and immediately pour the boiling water into the 8-9-inch pan. (Careful here, the steam can burn you!)
- Close the oven quickly.
- Bake for 40-50 minutes or until bread is golden brown and sounds hollow when lightly tapped on top.
(Thanks to the Kitchn for this method — more details on their post).

How to Make No-Knead Bread
The full No-Knead Bread recipe is below, so here we’ll give some tips for success:
- The refrigeration adds flavor. The longer the dough chills, the more noticeably complex the flavor is.
- No kneading! Really, when we say no kneading, we mean it! This dough is intentionally a very wet dough so kneading would be difficult anyway. Don’t over-work or over-handle the dough; it needs very minimal amounts of handling.
- Let the bread cool completely. The steam is still cooking inside the bread, so don’t cut into it until it has thoroughly cooled. If you cut into the loaf too quickly, the texture will be more spongey instead of light and airy.
- Use all-purpose or bread flour for best results. Bread flour has more protein than all-purpose flour, which helps with the bread’s gluten development and yields chewier bread. That said, all-purpose works great too, the bread is very slightly less chewy. The substitution is generally 1:1, but because of bread flour’s higher protein content, you may find yourself adding a touch less flour when using bread flour.

STORAGE
How To Store No-Knead Bread
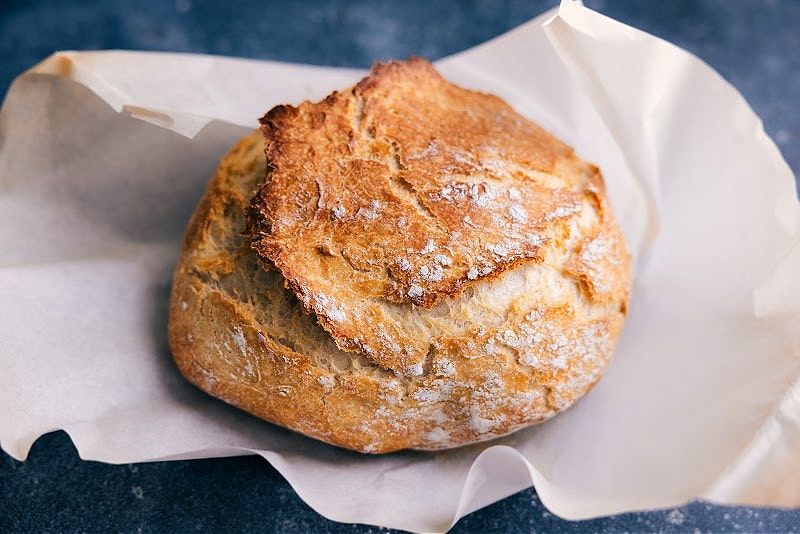
This bread is best day one and two. On the first day, leave it out, uncovered, with the cut side down on a cutting board (this keeps crust crisp without the inside drying out). After one day, store the bread in an airtight container or bag. It does lose its crispy texture being stored this way, but it’s still great after being toasted!
How To Freeze No-Knead Bread: Slice bread and individually wrap each slice. Place wrapped slices in an airtight bag or container and freeze for up to 3 months. Take bread slices straight from the freezer into the toaster. Toast and enjoy!

Use leftover yeast in one of these recipes:
Recipe Source: This recipe is based on Jim Lahey’s famous No-Knead Bread recipe (from New York Times).
No-Knead Bread
This is our favorite No-Knead Bread — an artisan-style white bread using simple, everyday ingredients and requiring only minimal hands-on time. Plus, all the tips and tricks to ensure success every single time!

No-Knead Bread
This is our favorite No-Knead Bread — an artisan-style white bread using simple, everyday ingredients and requiring only minimal hands-on time. Plus, all the tips and tricks to ensure success every single time!
Ingredients
- 2 teaspoons (6g) instant yeast (OR active dry)
- 1 tablespoon (20g) honey
- 1-1/2 cups (335g) warm water (Note 2)
- 3 cups (410g) all-purpose white flour, plus 2 tablespoons
- 1-3/4 teaspoons (12g) fine sea salt
- 1 teaspoon olive oil
Instructions
-
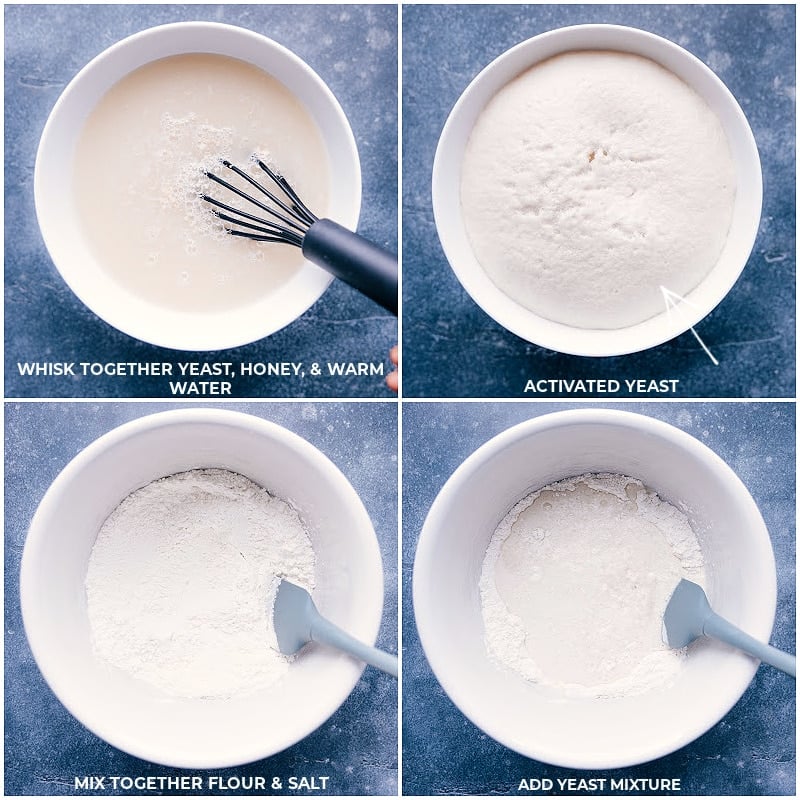
YEAST: Whisk 2 tsp. yeast, 1 tbsp. honey, and 1-1/2 cups warm water (not too hot, not too cold) in a medium bowl and let sit 5 minutes (It should look creamy/foamy after 5 minutes (see photo). If not, your yeast is dead and you’ll need to begin again. Either the yeast is dead or the water was too hot)
-
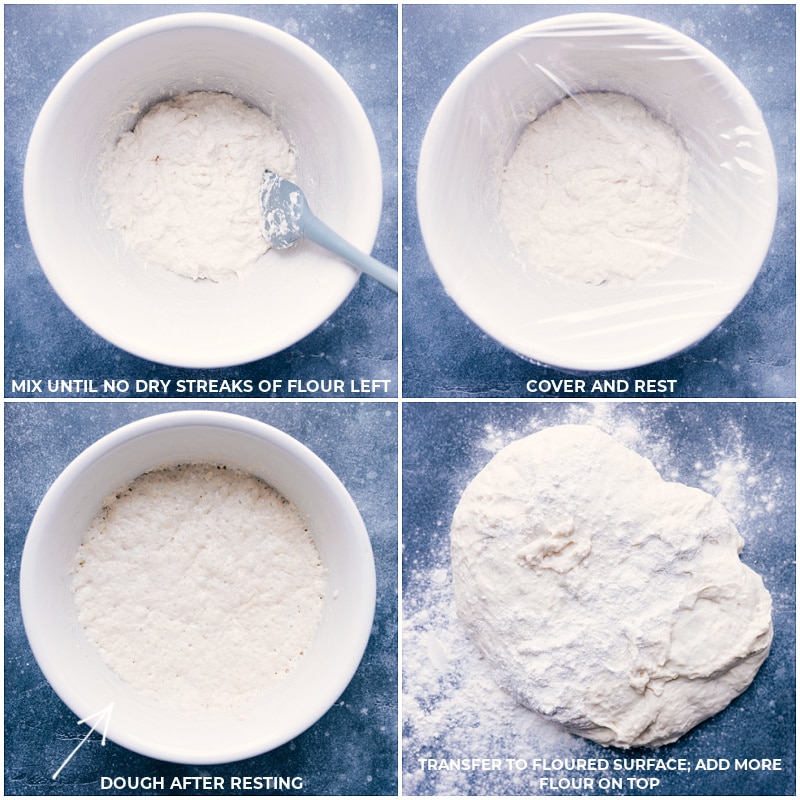
DOUGH PREP: Meanwhile, in a large mixing bowl (that will fit in your fridge), use a rubber spatula to mix together 3 cups flour and 1-3/4 tsp salt. Use that spatula to scrape every bit of the yeast mixture into the flour mixture. Stir with the spatula until a shaggy dough forms with no dry streaks of flour (see photo — should be sticky/wet). Add a touch more water or flour if needed. Use a spatula to pull the dough to one side and drizzle in the oil. Turn dough to coat in oil then cover bowl fully with plastic wrap. Two options for how to proceed:
-
OPTION 1: IF CHILLING DOUGH IN FRIDGE (Note 3)FIRST RISE: Set covered dough aside at room temperature (~70 degrees F (21 degrees C) on a counter for 2-3 hours or until it has doubled in size. It will look bubbly and be wobbly. If it hasn’t risen at all after an hour, move somewhere warmer. Or on a warm day, it may be risen/doubled in 45 minutes! For 2-Hour No-Knead Bread, see Note 4.OVERNIGHT RISE: After the dough has doubled in size, transfer to the fridge and let rise overnight, or at least 8 hours. It can stay in the fridge for up to 3 days before baking. (The longer the bread rests, the more flavor it will have.)
-
OPTION 2: IF YOU DON’T WANT TO CHILL DOUGH IN FRIDGE: Otherwise, prepare dough and let stand overnight at room temperature (~70 degrees F (21 degrees C) on counter for 10-18 hours.
-
PREP TO BAKE: When you’re ready to bake, remove the bowl from the fridge and let stand at room temperature for 45 minutes while the oven and pot preheat. (Pro-tip: set out some butter now if you’d like it to be room temperature for spreading!) Move oven rack to center of oven. Preheat the oven to 450 degrees F (230 degrees C). Add 5.5-quart cast iron pot to the oven to heat for 30 full minutes before baking bread.
-
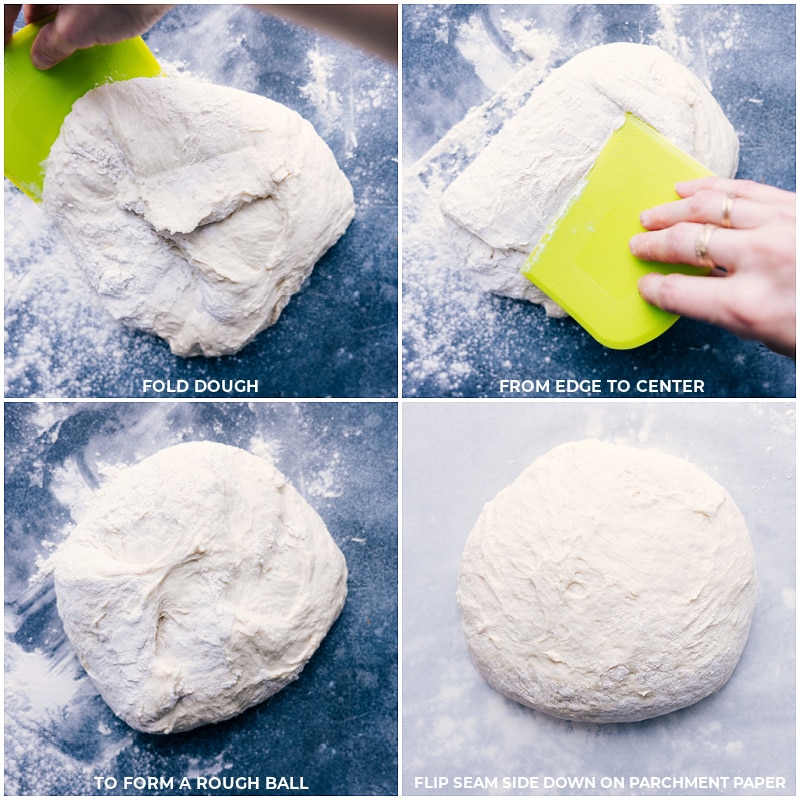
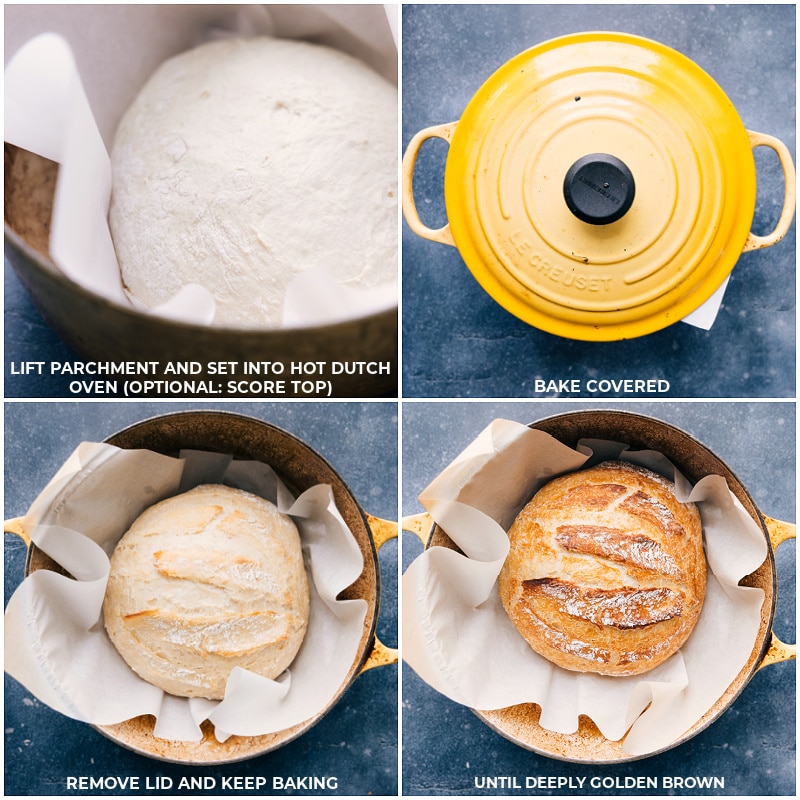
SHAPE AND BAKE: Sprinkle 1 tablespoon flour on a clean work surface. Use a spatula to scrape all of the dough out onto the flour. Sprinkle 1 more tablespoon flour on top. Use the spatula or dough scraper to gently fold the sides inwards, making a total of 6 folds, to form a rough ball shape (remember — no kneading!). Doesn’t need to be a perfect ball. Set out a large piece of parchment paper (Note 4) right next to the ball. Use the spatula or dough scraper to gently transfer the ball to parchment paper, flipping it upside down so the seam sides are down and touching the paper. Slide the ball to the middle and press in the sides to gently shape into a rough ball. (Optional: if you have a lamé and would like, score across the top 3-5 times). Working quickly, carefully pull the pot from the oven, remove the lid, and lift the parchment paper with dough up and into the pot. Cover pot with lid and bake for 30 minutes. After 30 minutes, keep the pot in the oven but remove the lid and bake for another 12-18 minutes or until it sounds hollow when tapped in the middle and is a deep golden brown on top.
-
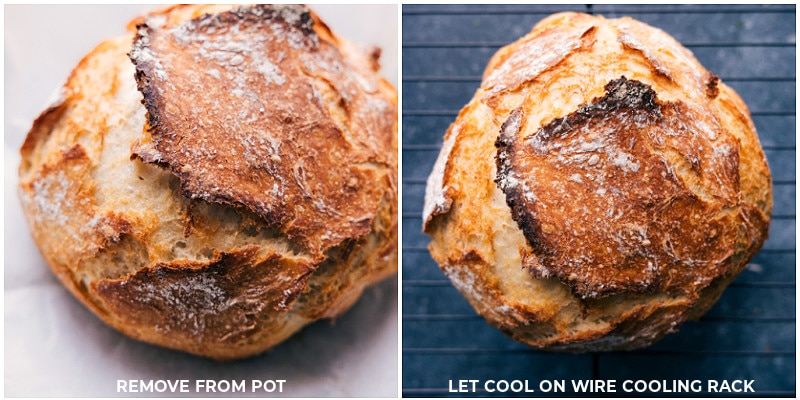
COOL: After baked, carefully remove the bread, holding the sides of the parchment paper. Slide the bread off the paper onto a wire cooling rack. Let cool for 30 full minutes. (The steam is still cooking the bread!) — Note 5. Once cooled, add bread to a cutting board and use a very sharp serrated knife to cut the bread. It’s tough to cut through the bottom crust without a sharp knife!
-
STORAGE: This bread is best day one and two. On the first day, leave it out, uncovered with the cut side down on cutting board (this keeps crust crisp without the inside drying out). After one day, store bread in an airtight container or bag. It does lose its crispy texture being stored this way, but it’s still great after being toasted!
Recipe Notes
Note 2: Water temperature: Drizzle a few drops of the warmed water onto the inside of your wrist. If it is warm and comfy for you, it will be perfect for the yeast. If it is not warm and instead feels hot, it will be too hot for the yeast. Too cold and the yeast will simply remain dormant.
Note 3: Chill in the fridge: The longer the bread chills, the more flavorful it becomes (for up to 3 days). But even one night in the fridge will be great! If you plan to chill the dough for 2 or 3 days, you don’t need it to rise at all at room temperature — prepare the dough then you can immediately refrigerate it.
Note 4: No-Knead Bread In a Hurry: After 2-3 hours, you can bake the bread immediately. The flavor/texture isn’t as good as it is after long rest, but still tasty!
Note 5: Parchment paper: Be sure you’re using parchment paper– not foil or wax paper. Wax paper will melt in the oven! Without parchment paper, the bottom crust is too tough.
Note 6: Cooling: This rest time is just as important as the bake time! The residual heat and steam ensure the inside is fully baked through. As tempting as it is to cut in, don’t rush it because you’ll likely end up with a mushy instead of airy inside texture.
Nutrition Facts
Serving: 1serving | Calories: 117kcal | Carbohydrates: 23.8g | Protein: 3.2g | Fat: 0.7g | Sodium: 194.4mg | Fiber: 0.8g | Sugar: 0.1g
We do our best to provide accurate nutritional analysis for our recipes. Our nutritional data is calculated using a third-party algorithm and may vary, based on individual cooking styles, measurements, and ingredient sizes. Please use this information for comparison purposes and consult a health professional for nutrition guidance as needed.
[ad_2]
Source link


